Custom POP displays are purpose-built retail fixtures designed to maximize product visibility, shopper engagement, and brand impact at the point of purchase. Unlike standard shelf placements, these bespoke retail displays give brand managers direct control over how a product is presented, positioned, and experienced inside a store. The difference between a product that moves and one that sits is often the quality of its display program. This guide walks you through the full process, from concept to rollout, covering design workflow, material selection, artwork preparation, and ROI measurement, so you can build a display program that performs.
What are custom POP displays and why do they matter?
Custom POP displays are branded, purpose-engineered fixtures placed throughout a retail environment to capture shopper attention and drive purchase decisions. The term "point of purchase displays" is the broader industry category, covering everything from shelf talkers and dump bins to freestanding display units and sidekick attachments at endcaps. What makes a display "custom" is that it is designed specifically for your brand, your product dimensions, and your retail environment, rather than pulled from a generic catalog.
The strategic value is real. A well-executed display does three things simultaneously: it communicates brand identity, organizes product presentation, and triggers an unplanned purchase decision. Brands like Fossil, Ray-Ban, and Porsche invest in custom retail signage and display programs precisely because generic fixtures cannot carry that weight. When a shopper encounters a display that feels intentional and premium, it transfers that perception directly to the product.

Retailers also have a stake in this. Big-box and club store buyers evaluate display submissions against strict compliance criteria, including footprint limits, pallet standards, and load capacity. A display that fails compliance review never reaches the floor. That means your display program must satisfy both the shopper and the retailer, which is why custom solutions built with those constraints in mind consistently outperform off-the-shelf alternatives.
How to design custom POP displays from concept to rollout
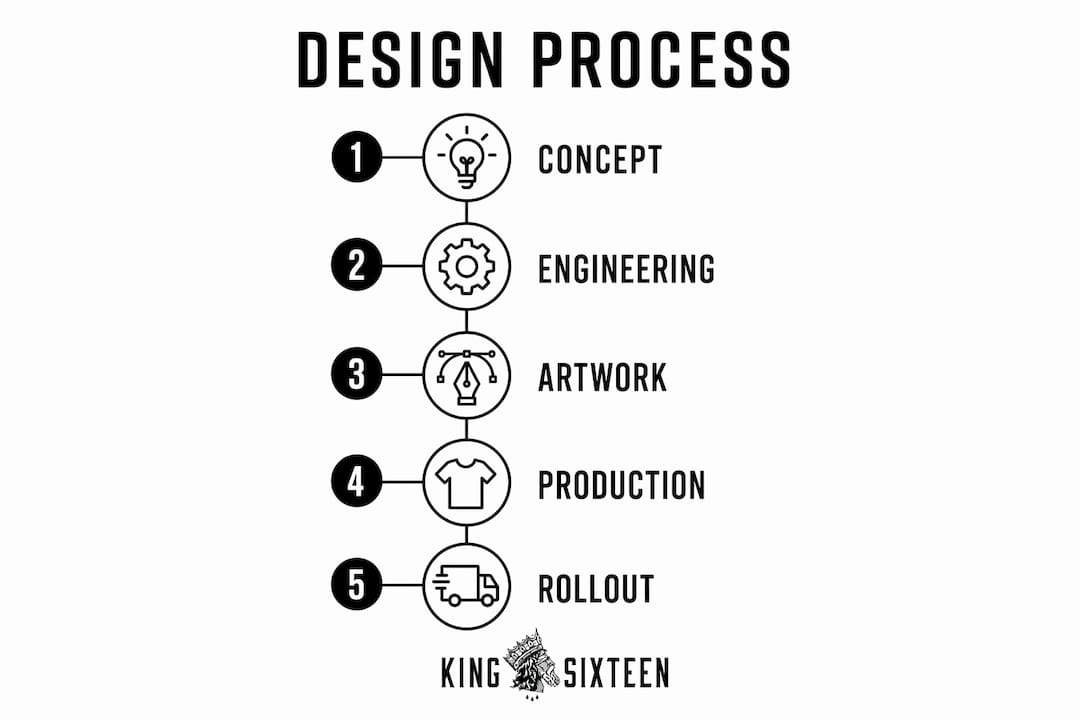
Custom POP display development follows a five-step process: strategic consultation, structural and visual design, prototyping and testing, manufacturing, and rollout coordination. Each stage builds on the last, and skipping or rushing any one of them creates compounding problems downstream.
-
Strategic consultation. This is where campaign goals, retailer requirements, product dimensions, and budget are defined. The output is a creative brief that aligns marketing, design, and supply chain teams before a single line is drawn.
-
Structural and visual design. Engineers and graphic designers work in parallel. Structural design determines load capacity, assembly method, and footprint. Visual design handles brand graphics, color systems, and messaging hierarchy. These two tracks must be integrated, not sequential.
-
Prototyping and testing. A physical prototype is built and tested against retailer compliance standards, including footprint limits and pallet standards. This stage catches geometry errors and structural weaknesses before they reach manufacturing.
-
Manufacturing. Once the prototype is approved, production begins at scale. Order quantities, lead times, and quality control checkpoints are managed here.
-
Rollout coordination. Shipping, installation logistics, and in-store placement are planned and executed. For multi-store programs, this stage often determines whether the display succeeds or fails in practice.
Pro Tip: Treat your display as a system, not just a graphic design project. The structural engineer and the brand designer need to be in the same room from day one. Misalignment between those two disciplines is the most common reason display programs miss their launch window.
How to prepare artwork files to avoid production delays
Poor artwork preparation is the single most preventable cause of production delays in custom display projects. Submitting only visual mockups or low-resolution files forces manufacturers to recreate geometry from scratch, which introduces misalignment risk and adds sample cycles to your timeline.
Here is what production-ready artwork requires:
- Correct dielines. A dieline is the structural map of your display. It defines every cut, fold, and panel. Without it, your graphic file has no reference for where images and text should land.
- Vector logos and graphics. Raster files degrade when scaled. Vector files, typically in AI or EPS format, maintain sharpness at any size.
- CMYK color mode. RGB is for screens. CMYK is for print. Submitting RGB files causes color shifts in production that are difficult to correct after the fact.
- Bleed and safe zones. Artwork must extend beyond the trim line (bleed) and critical content must stay inside the safe zone. Both values are specified in the dieline.
- High-resolution images. 300 DPI minimum for all photographic elements at final print size.
- Layered, editable files. Manufacturers need to make small adjustments during production. Flattened files remove that flexibility and slow approvals.
Common artwork errors include embedded fonts that are not outlined, missing linked files, and incorrect panel dimensions. Each one triggers a revision cycle that can add days or weeks to your timeline.
Pro Tip: Request the structural dieline from your supplier before your design team starts building artwork. This one step eliminates the most common source of back-and-forth and keeps your production schedule intact.
How to choose materials and formats for your display program
Material selection should be driven by campaign duration, retail environment, and budget, not by what looks best in a presentation deck. Choosing the wrong material often results in premature display degradation or over-investment for a short-term promotion.
| Material | Best for | Typical campaign length | MOQ |
|---|---|---|---|
| Corrugated cardboard | Temporary promotional displays, seasonal campaigns | 4 to 12 weeks | 500+ units |
| Acrylic | Semi-permanent brand fixtures, cosmetics, electronics | 3 months to 5 years | 50+ units |
| Metal | High-traffic permanent displays, hardware, automotive | 1 to 5+ years | Varies |
| Wood | Premium retail environments, luxury goods | Permanent or semi-permanent | Custom |
Corrugated is the workhorse of temporary promotional displays. It is cost-effective, recyclable, and fast to produce, making it the default choice for CPG brands running quarterly promotions. Acrylic works well for brands that need a premium look at a mid-range price point, particularly in beauty and consumer electronics. Metal and wood are reserved for permanent or near-permanent installations where durability and brand prestige justify the higher cost.
Format selection is equally important. The most common point of purchase display formats include:
- Freestanding display units (FSDUs). Floor-standing fixtures that create a branded zone within the store. High visibility, high cost.
- Endcap displays. Placed at the end of a store aisle, these capture traffic from multiple directions and command premium placement fees.
- Counter displays. Compact units placed near checkout. Ideal for impulse purchases and small-format products.
- Pallet displays. Used in club stores like Costco and Sam's Club. Must meet strict pallet footprint and load standards.
- Clip-strips and sidekick attachments. Low-cost, high-frequency formats that attach to existing shelving. The custom POP sidekick format, for example, is 100% customizable and optimized for high-traffic endcaps and checkout zones.
Your format choice should match where your shopper makes the final decision, not just where your product is stocked. A display comparison guide can help you map formats to specific retail environments and campaign objectives.
How do you measure the ROI of a POP display program?
Measuring POP display ROI requires comparing incremental sales lift in stores with displays against control stores without them. Measuring only total revenue in display stores is the most common mistake. It conflates seasonal trends, promotional pricing, and distribution changes with the actual impact of the display.
A clean measurement framework follows four steps:
- Set a baseline. Select a matched set of control stores with similar volume, demographics, and shelf placement. Run both groups for at least four weeks before the display launches.
- Track the right metrics. Sales lift percentage, sell-through rate, time-to-empty, and retail execution compliance are the four metrics that matter most. Sell-through rate tells you how fast product moves relative to what was stocked. Time-to-empty tells you whether the display was sized correctly for replenishment cadence.
- Calculate incremental lift. The formula is straightforward: (Sales in display stores minus Sales in control stores) divided by Sales in control stores, expressed as a percentage. This isolates the display's contribution from everything else.
- Factor in total program cost. Include design, manufacturing, shipping, installation, and any retailer placement fees. Divide incremental revenue by total cost to get your true ROI.
"POP display ROI measurement should be designed into the campaign from the start, with test versus control store comparisons built in before launch, not added as an afterthought."
The data you collect from one campaign becomes the brief for the next. Brands that measure engagement and ROI from their display programs consistently improve performance over successive campaigns because they are optimizing against real numbers, not assumptions.
Key takeaways
Custom POP display programs succeed when design, engineering, compliance, and measurement are treated as one integrated system, not four separate workstreams.
| Point | Details |
|---|---|
| Design is a system, not just graphics | Structural engineering and visual design must run in parallel from day one. |
| Artwork preparation prevents delays | Submit correct dielines, vector files, CMYK colors, and bleed before production begins. |
| Match materials to campaign duration | Use corrugated for short promotions and acrylic or metal for longer-term fixtures. |
| ROI requires a control group | Compare display stores against matched control stores to isolate true sales lift. |
| Compliance is non-negotiable | Retailer footprint, pallet, and load standards must be met before any display reaches the floor. |
What most display programs get wrong
I have seen brand managers spend months perfecting the visual design of a display, only to watch the program stall because the structural file was never shared with the artwork team. The display looked great in the presentation. It failed compliance review because the footprint was two inches too wide for the retailer's floor plan. That is not a design failure. It is a process failure.
The brands that run the most effective custom display builds treat the display brief the same way they treat a product launch brief. They define success metrics before the design starts. They loop in the retailer's category manager early. They build the measurement framework into the campaign plan, not the post-mortem.
The other thing I would push back on is the instinct to over-invest in permanent materials for what is effectively a short-term promotion. A corrugated display executed with precision and the right graphic system will outperform an acrylic fixture that was rushed through production every time. Material quality matters less than execution quality. Get the process right first, then scale up the materials as your program matures.
Finally, do not underestimate logistics. For a 500-store rollout, shipping and installation coordination is as complex as the design itself. The display that wins is not always the most visually striking one. It is the one that arrives on time, assembles correctly, and gets placed in the right location by the right person.
— Tyler
How Kingsixteen builds display programs that perform
At Kingsixteen, we design and build physical brand assets that do more than fill floor space. Our custom fabrication work spans installations, retail environments, and display systems for brands like Porsche, Ray-Ban, and Fossil, where the margin for error is zero and the standard for execution is high. We bring the same turnkey model to experiential marketing that we apply to full-scale brand activations: one team, one process, and full accountability from concept through rollout. If you are building a display program and want it done right the first time, we should talk.
FAQ
What are custom POP displays used for?
Custom POP displays are used to increase product visibility, drive unplanned purchases, and reinforce brand identity at the point of purchase. They are placed throughout the store, not just at checkout, and include formats like freestanding units, endcaps, counter displays, and pallet displays.
How long does it take to produce a custom POP display?
Production timelines vary by material and complexity, but most programs run 8 to 16 weeks from brief to delivery. Corrugated displays move faster than acrylic or metal, and artwork delays caused by incorrect files are the most common reason programs miss their launch date.
What is the minimum order quantity for custom displays?
MOQs depend on material. Corrugated displays typically require 500 or more units, while acrylic displays can be ordered in quantities of 50 or more. Metal and wood fixtures are often quoted on a custom basis depending on complexity and supplier.
How do you calculate ROI for a POP display?
Divide the incremental revenue generated by display stores (compared to matched control stores) by the total program cost, including design, manufacturing, and logistics. This gives you a true ROI figure that accounts for the display's actual contribution rather than broader sales trends.
What file formats do manufacturers need for custom POP displays?
Manufacturers require layered vector files (AI or EPS), correct dielines, CMYK color mode, 300 DPI images, and proper bleed settings. Submitting production-ready files from the start eliminates the most common source of production delays.