Branded installations are defined as physical brand experiences designed to engage audiences and extend brand identity beyond traditional marketing channels into real, three-dimensional space. Unlike a banner or a digital ad, a well-executed installation makes visitors feel the brand rather than simply see it. The industry term for this discipline is environmental branding, and it covers everything from a pop-up activation at a trade show to a permanent lobby environment at a flagship headquarters. Knowing how to create branded installations that actually perform requires clear objectives, thorough planning, and disciplined execution at every phase.
What must a project brief for a branded installation include?
A comprehensive installation brief is the single most important document you will produce before any design work begins. Without it, proposals become guesswork and budgets spiral. A strong brief covers 7 core components: goals, audience, space, timeline, budget, visual references, and constraints. Aim for 2–4 pages. Longer briefs do not produce better proposals; focused briefs do.
Here is what each component must contain:
- Project goals and success metrics. Define what the installation must achieve. Foot traffic, dwell time, social shares, and lead capture are all measurable. Vague goals like "create buzz" produce vague proposals.
- Audience profile and visitor flow. Describe who will experience the installation, how many people per hour, and any accessibility requirements. A children's museum activation has completely different flow demands than a VIP product launch.
- Space documentation. Provide floor plans, ceiling heights, utility locations, load-bearing specs, and photographs. Missing this information causes redesigns and delays after fabrication has started.
- Timeline with key milestones. Include submission deadlines, approval gates, fabrication windows, and the event date. Leave buffer time for revisions.
- Budget range. Share a realistic number. Without a budget range, proposals can vary from $20,000 to $500,000 for the same brief. That range wastes everyone's time and produces nothing useful.
- Visual references and brand guidelines. Attach your brand book, color palette, typography standards, and mood board references. Creative teams need these to align quickly.
- Constraints. List legal, logistical, and technical limitations upfront. Venue restrictions, union labor rules, noise ordinances, and power limitations all affect design choices.
Pro Tip: Include at least three visual references that show the emotional tone you want, not just the aesthetic. A photo of a quiet forest conveys a different sensory goal than a photo of a neon-lit arcade, even if both use the same color palette.
| Brief Component | What to Include |
|---|---|
| Goals and metrics | Specific KPIs: dwell time, leads, social impressions |
| Audience and flow | Visitor volume per hour, demographics, accessibility needs |
| Space documentation | Floor plans, ceiling heights, utility access, photos |
| Timeline | Milestones, approval gates, event date, buffer time |
| Budget range | Realistic range to align proposals with actual options |
| References and brand guidelines | Brand book, color palette, mood board images |
| Constraints | Venue rules, union requirements, power and noise limits |
How do you design branded installations that feel immersive?
The most common design mistake is leading with technology. Brands ask for projection mapping or AR before they have defined what they want visitors to feel. Specifying emotional outcomes first enables creative teams to find efficient solutions rather than expensive fixes. Start with the emotional goal, then work backward to the materials and technology that deliver it.
Here is a practical design sequence for creating themed installations that hold together:
- Define the sensory goal. Decide whether the space should feel energizing, calm, luxurious, or playful. Every subsequent decision should serve that goal.
- Design with lighting as a primary tool. Lighting dramatically affects how visitors perceive and remember brand spaces. Warm directional light reads as premium. Cool diffused light reads as clinical. Lighting is not decoration; it is brand communication.
- Select materials for texture and meaning. Rough concrete signals industrial credibility. Polished brass signals heritage and craft. Material texture reinforces brand character without a single word of copy.
- Plan acoustics deliberately. Sound absorption or reflection changes how a space feels. A brand that values calm and clarity should not put visitors in a reverberant room with hard surfaces.
- Map visitor flow and wayfinding. Poor flow planning results in confusion, bottlenecks, and weak brand impact. Design the path visitors take as carefully as you design the visual elements they see along it.
- Layer branding beyond the logo. Use brand-specific shapes, patterns, fixture styles, and furniture silhouettes. A logo on a wall is a sign. A space built from brand-consistent materials and proportions is an experience.
Pro Tip: Walk the space yourself before finalizing the design. Stand at the entry point and ask: "What does a first-time visitor see, hear, and feel in the first ten seconds?" That ten-second window sets the entire brand impression.
Durability matters as much as aesthetics. Materials that look great on day one but show wear by day three undermine the brand. For sensory branding to work consistently across the life of an installation, specify materials rated for the expected traffic volume and environmental conditions.
What are the practical steps to plan, budget, and schedule an installation?
Timeline and budget are where most branded installation projects fail. The planning phase is not a formality; it is where you protect the execution phase from chaos.
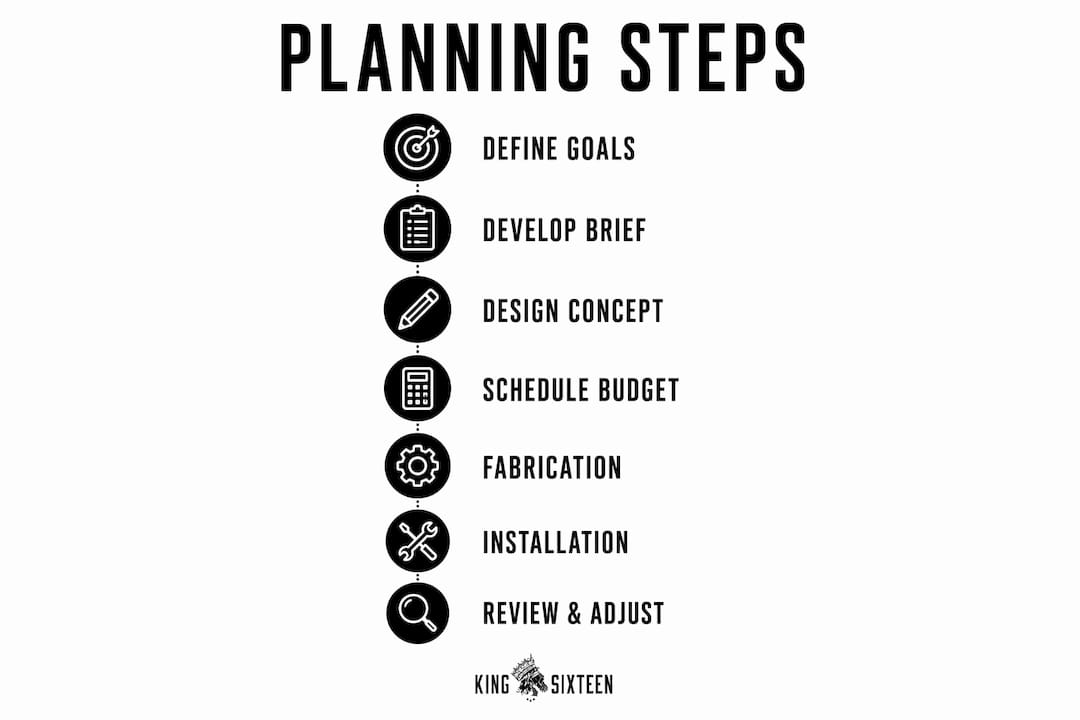
Project timelines vary significantly by installation type. Pop-up activations typically require 8–12 weeks from brief to open. Permanent installations need 3–6 months or longer. That difference reflects fabrication complexity, permitting, and the number of approval cycles involved. Build your schedule around the event date and work backward, not forward.
Key planning steps include:
- Engage stakeholders early. Marketing, facilities, IT, and finance all have input that affects design decisions. Discovering a power limitation or a union labor requirement after fabrication starts is expensive. Get those conversations done in week one.
- Understand cost ranges by complexity. Simple AR activations can cost tens of thousands of dollars. Complex projection-mapped environments frequently reach six figures. Knowing where your project sits on that spectrum shapes every design decision.
- Schedule build, calibration, and testing time. Three hours of on-site calibration and testing is typical for temporary events and must be booked into the venue schedule in advance. Skipping this step is the fastest way to have a broken installation on opening day.
- Plan for maintenance and staffing. Decide who manages the installation during the event. Technology fails. Consumables run out. A staffing plan is not optional.
- Consider modular design from the start. Planning for modular construction early reduces costs and increases flexibility if the installation needs to tour multiple locations.
Pro Tip: Add a 15% contingency to your fabrication budget and a two-day buffer before your event date. These two buffers resolve the majority of last-minute crises without requiring emergency spending.
Which mistakes most often reduce the effectiveness of branded installations?
The gap between a good installation and a forgettable one usually comes down to a handful of avoidable errors. Recognizing them before you start is far cheaper than fixing them on-site.
- Leading with technology instead of experience. Projection mapping and interactive screens are tools, not strategies. If the technology does not serve a clear emotional goal, it becomes a distraction.
- Underestimating on-site setup time. Build and calibration time is consistently underestimated, especially by teams new to physical installations. A setup that looks simple in a CAD drawing often takes three times longer in a real venue with real constraints.
- Withholding the budget. Agencies and fabricators cannot solve a problem they do not understand. Sharing your budget range produces proposals that are actually buildable.
- Ignoring visitor flow. A beautiful installation that creates a bottleneck at the entrance fails its primary job. Good installations guide visitors intuitively without causing confusion or stops.
- Over-relying on logos. A logo repeated across every surface is not a brand experience. It is wallpaper. Layered brand identity uses form, material, light, and sound to communicate brand values without spelling them out.
- Skipping maintenance planning. An installation that looks worn or broken by day two sends a brand message you did not intend. Plan for daily maintenance and assign a responsible person before the event opens.
Successful installations are strategic brand extensions, not cosmetic upgrades or logo placements. They must align with business objectives and brand strategy to genuinely connect with audiences. When they do, the results extend well beyond the event itself.
Brand consistency across every element of the installation, from the entry signage to the exit experience, is what separates a memorable environment from a collection of branded props.
Key Takeaways
Effective branded installations require emotional clarity, thorough planning, and layered brand identity to produce lasting audience engagement and measurable results.
| Point | Details |
|---|---|
| Brief before design | A 2–4 page brief with 7 core components prevents misaligned proposals and wasted budget. |
| Emotion before technology | Define the sensory goal first; select materials and technology to serve it. |
| Timeline by type | Allow 8–12 weeks for pop-ups and 3–6 months for permanent installations. |
| Budget transparency | Sharing a budget range keeps proposals realistic and comparable. |
| Layer the brand identity | Use light, material, sound, and form, not just logos, to communicate brand values. |
What I've learned from building installations that actually work
The installations that perform best share one quality: they were treated as brand assets from day one, not as event decoration. The teams behind them made decisions about emotional outcomes before they made decisions about materials or technology. That sequence matters more than any single design choice.
The biggest time wasters I see are late stakeholder alignment and withheld budgets. When facilities, IT, and finance are brought in after the design is locked, the result is expensive redesigns. When clients share a budget range upfront, the entire process moves faster and produces better work. These are not complicated fixes. They are communication habits.
Sensory consistency is the detail most teams underinvest in. Lighting, acoustics, and material texture are not finishing touches. They are the primary tools that make a visitor feel the brand rather than just see it. If you get those three elements right, the logo almost becomes secondary.
Finally, build for the second event. Modular design and touring capability cost a fraction of building a new installation from scratch. The brands that get the most value from physical environments are the ones that plan for reuse from the first conversation.
— Tyler
Kingsixteen builds branded installations that make brands felt
Kingsixteen works with established brands and marketing leaders who need physical environments that perform, not just impress. From concept through fabrication, staffing, and on-site execution, the team handles every phase of the installation process under one roof.
Whether you are planning a product launch activation, a conference environment, or a permanent brand space, Kingsixteen brings the production discipline and creative depth to get it right the first time. The agency has built immersive brand experiences for clients including Porsche, Audi, Ray-Ban, and the Natural Diamonds Council. If you have an upcoming installation project, the best time to start the conversation is before the brief is written.
FAQ
What is a branded installation?
A branded installation is a physical, three-dimensional environment designed to communicate a brand's identity and engage visitors through sensory and spatial experience. It is the core practice within environmental branding.
How long does it take to create a branded installation?
Pop-up installations typically require 8–12 weeks from brief to completion, while permanent installations need 3–6 months or longer depending on complexity and permitting.
How much does a branded installation cost?
Costs range widely by scope and technology. Simple activations can run tens of thousands of dollars, while complex projection-mapped environments frequently reach six figures.
What is the most common mistake in designing branded spaces?
Leading with technology before defining the emotional goal is the most frequent error. Specifying what visitors should feel first produces better creative solutions at lower cost.
How do I make a branded installation feel consistent with my brand?
Use layered sensory design that includes lighting, material texture, acoustics, and spatial flow, not just logos and color. Sensory consistency is what makes a space feel unmistakably like your brand.