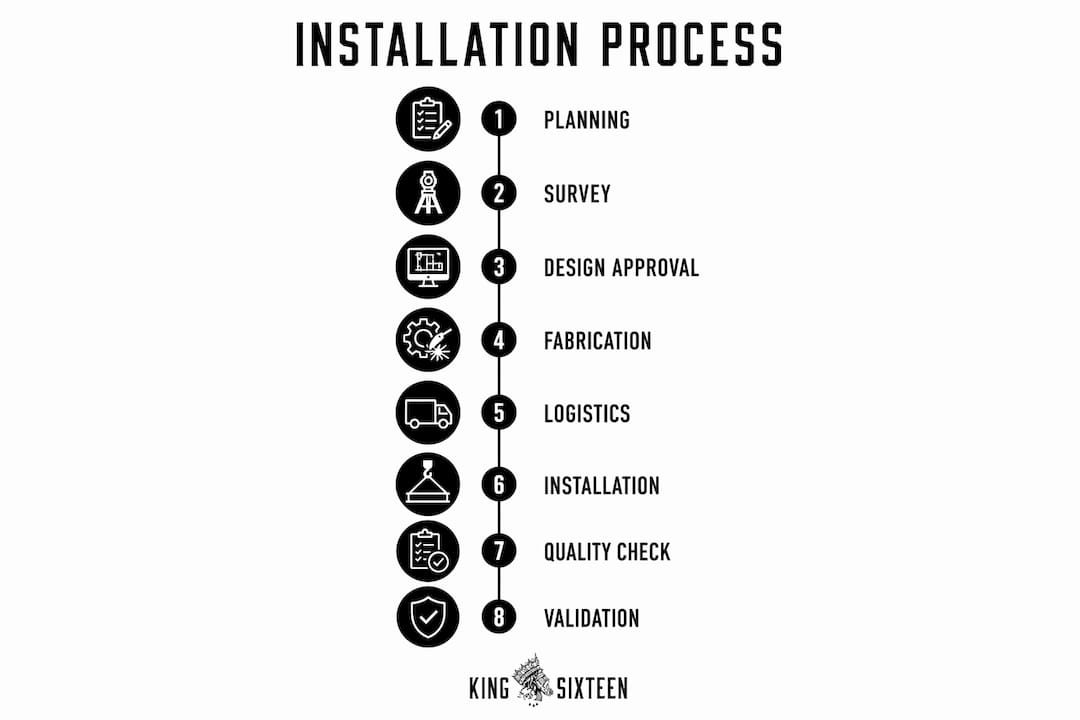
The custom brand installation process is a multi-phase workflow that transforms brand concepts into physical experiences through coordinated planning, fabrication, and on-site execution. In experiential marketing, the industry term for this discipline is "brand rollout management," and it covers everything from initial site surveys to final quality sign-off. The physical installation process consists of eight core phases: planning, survey, design approval, fabrication, logistics, installation, quality validation, and final handover. Each phase builds directly on the last. Skipping or rushing any one of them creates compounding problems that show up on installation day, in front of your audience.
What does the custom brand installation process actually require?
The custom brand installation process starts long before anyone picks up a tool. The two most critical prerequisites are a detailed site survey and a standardized field packet. Both exist to eliminate guesswork before crews arrive on site.
Site surveys must document substrate type and ambient conditions to select the correct adhesives and fasteners. Masonry type, glass thickness, temperature, and humidity all affect which materials will hold and which will fail. A survey that misses these details does not just slow the project. It causes installation failures that require costly rework.

The field packet is equally non-negotiable. Standardizing the field packet with site contacts, access windows, surface prep requirements, and escalation thresholds prevents interpretation errors across multi-location installations. Think of the field packet as the single source of truth for every crew member, regardless of which city they are working in.
Core prerequisites for any brand installation:
- Completed site survey with substrate, surface condition, and environmental data
- Field packet containing contact names, access hours, escalation paths, and surface prep specs
- Permit intelligence database covering local jurisdiction requirements
- Approved design files with material callouts matched to site conditions
- Confirmed logistics plan with delivery windows and crew schedules
Pro Tip: Build your permit intelligence database before fabrication begins. Permitting timelines vary dramatically by jurisdiction, and late permits are the single most common cause of delayed installations on national rollouts.
| Prerequisite | Purpose |
|---|---|
| Site survey | Documents substrate and conditions for correct material selection |
| Field packet | Standardizes crew instructions and reduces on-site errors |
| Permit database | Tracks jurisdiction requirements and submission timelines |
| Approved design files | Confirms material specs match real-world site conditions |
| Logistics plan | Aligns delivery, crew, and access windows to prevent conflicts |
How do you coordinate design approvals, fabrication, and logistics for brand consistency?
Design approval is where brand guidelines meet physical reality. Your approved artwork must account for the actual substrate, lighting conditions, and viewing distance at each site. A color that reads perfectly on screen can shift significantly when printed on a brushed aluminum panel under fluorescent lighting. Material selection must be locked before fabrication begins, not adjusted on site.
Quality control during fabrication protects you from the most expensive problem in brand rollouts: rework. Proof approvals at the fabrication stage catch dimensional errors, color mismatches, and structural issues before they become field problems. Brand consistency across multiple sites depends on catching these discrepancies in the shop, not after installation.
Logistics coordination is where many brand managers underestimate complexity. Shipping waves must align with permit approvals, crew availability, and site access windows. A pallet that arrives two days early at a retail location with no storage space creates a chain reaction of delays.
Key coordination checkpoints:
- Design proof approved against physical material samples, not just digital renders
- Fabrication QC sign-off before any piece ships to the field
- Shipment waves scheduled around confirmed permit dates and site access windows
- Crew briefings completed before materials arrive on site
Pro Tip: Request physical material samples alongside digital proofs during the approval stage. What you approve on screen and what gets installed are two different things if you skip this step.
What are the step-by-step procedures for on-site installation and quality validation?
On-site installation is the phase where every prior decision either pays off or falls apart. A structured day-of process prevents both.
-
Pre-installation briefing. Gather the full crew before work begins. Review the field packet, confirm site contacts, and walk the space. Every crew member should know the sequence, the escalation path, and the brand placement rules before touching a surface.
-
Site setup and surface preparation. Protect surrounding surfaces with drop cloths or masking. Clean and degrease all mounting surfaces. For vinyl graphics, this step determines adhesion quality and long-term durability.
-
Mounting and installation. Follow the approved method for each element: direct mounting for permanent signage, raceway mounting where surface penetration is restricted. Align every piece to the approved placement diagram, not by eye.
-
Electrical testing for illuminated elements. Test all connections before closing panels or concealing wiring. Verify that illuminated signs meet the specified brightness and color temperature. A sign that flickers on opening day is a brand problem, not just a technical one.
-
Final inspection and photo documentation. Walk every installed element against the approved design files. Document each piece with timestamped photos from the same angles specified in the field packet. This creates a verifiable record for the client and a reference point for future installations.
-
Site cleanup and handover. Remove all packaging, tools, and protective materials. Leave the space in the condition specified in the contract. A clean handover is the last impression you make on the site team.
Scheduling installations during off-hours minimizes customer disruption, particularly in retail and healthcare environments. The sequence of removal, cleaning, and installation must also prevent surfaces from being exposed for extended periods.
Pro Tip: Assign one crew member specifically to photo documentation. When that responsibility is shared, it gets skipped under time pressure, and you lose your quality validation record.
How do you manage multi-location rollouts without losing quality or schedule?
Multi-location brand rollouts fail most often at the handoff between planning and execution. The solution is a phased approach built around pilot waves and centralized oversight.
Pilot waves involving 1–3 locations allow you to refine field packets and resolve site-specific issues before full rollout. Pilot tests surface conflicts that no survey fully anticipates: unexpected structural elements, access restrictions, or substrate conditions that differ from documentation. Fixing these issues at one location costs a fraction of what it costs to fix them at fifty.
Centralized dashboards tracking permits and installation progress prevent administrative chaos and keep rollout schedules intact. Live updates and version control improve communication and reduce duplicated efforts across large teams. Without a single source of progress data, regional crews operate on different assumptions and brand consistency suffers.
Rollout management priorities:
- Run a pilot wave at 1–3 locations before scaling
- Gate full rollout on pilot sign-off, not just schedule pressure
- Use a centralized dashboard for permit status, crew assignments, and installation progress
- Schedule installations in waves with defined readiness criteria for each wave
- Source crews from a vetted nationwide network rather than fragmented local vendors
Using a single accountable partner with standardized quality control delivers better brand consistency than fragmented local installers. This is not a cost argument. It is a quality argument. The savings from lowest-cost local vendors disappear quickly when rework, schedule delays, and inconsistent visuals are factored in.
| Rollout phase | Key action |
|---|---|
| Pilot wave | Install at 1–3 sites, document issues, refine field packet |
| Wave readiness gate | Confirm permits, materials, and crew before each wave launches |
| Progress tracking | Update centralized dashboard daily with status and photo evidence |
| Quality validation | Complete inspection checklist at every site before handover |
What are the most common pitfalls in brand installation and how do you avoid them?
The most damaging mistakes in brand installation are not technical. They are organizational. They happen before anyone arrives on site.
-
Misaligning installers with brand guidelines. Installers must be stakeholders aligned with brand standards from project inception, not contractors handed a spec sheet on installation day. When crews do not understand the brand's visual rules, placement decisions get made by default, and the result is inconsistent across locations.
-
Underestimating permitting complexity. Early permit intelligence is non-negotiable for national rollouts. Jurisdictions vary widely in requirements, timelines, and revision cycles. Brands that treat permitting as an afterthought routinely face installation delays measured in weeks, not days.
-
Choosing installers on price alone. Lowest-cost installers often lack nationwide networks and standardized processes. The result is quality inconsistency, rework, and higher long-term costs. Vetting for capability and coverage matters more than the initial quote.
-
Scheduling during business hours in high-traffic locations. Customer disruption during installation damages the brand experience you are trying to build. Off-hours scheduling is a standard practice in retail and healthcare for this reason.
"Marketing teams often underestimate the installer's role in brand experience, risking inconsistent visual output if not aligned with project briefs. Installers must be stakeholders aligned with brand standards and placement rules from project inception." — Signage Deployment Checklist
Authenticity in brand visuals depends on consistent physical execution. A brand that looks different at every location sends a signal that undermines trust, regardless of how strong the creative concept is.
Key Takeaways
A successful custom brand installation process requires structured phases, standardized documentation, and vetted execution partners working from a single source of truth at every site.
| Point | Details |
|---|---|
| Start with a thorough site survey | Document substrate, surface conditions, and environment before selecting materials or beginning fabrication. |
| Standardize the field packet | Every crew member at every location needs the same instructions, contacts, and escalation paths. |
| Run a pilot wave first | Test 1–3 locations before full rollout to surface site-specific issues and refine your process. |
| Gate rollout on readiness, not schedule | Launching waves before permits and materials are confirmed creates compounding delays. |
| Treat installers as brand stakeholders | Crews aligned with brand guidelines from day one produce consistent results across all locations. |
Why installation is the most underrated part of brand strategy
Most brand managers I talk to think of installation as the last mile. Get the creative right, get the fabrication done, and then hand it off to a crew to put it up. That framing is exactly where things go wrong.
Installation is where the brand becomes physical. It is the moment your audience first encounters the work in the real world, and every decision made in the field either reinforces or undermines everything that came before it. I have seen beautifully designed activations lose their impact because a crew installed panels two inches off-center, or because a color-matched element was substituted on site without approval. The creative was flawless. The execution was not.
The brands that get this right treat their installation partners the way they treat their design agencies: as collaborators with a seat at the table from the start. When installers understand the brand's visual language, they make better decisions under pressure. When they are handed a spec sheet on day one of installation, they make guesses. For high-impact brand recognition, the physical execution has to match the strategic intent.
My recommendation to every brand manager overseeing a multi-location rollout: attend the pilot wave installation yourself. Walk the space before and after. You will learn more about your process in four hours on site than in four weeks of status calls.
— Tyler
Kingsixteen brings your brand installation vision to life
Kingsixteen works with established brands that need physical installations executed at the level their brand demands. From experiential marketing campaigns to multi-location brand activations, the team manages design, fabrication, logistics, and on-site execution through a single accountable structure.
Clients like Porsche, Ray-Ban, and the Natural Diamonds Council trust Kingsixteen because the agency treats every installation as a brand moment, not a logistics task. If you are planning a product launch, a retail rollout, or a large-scale activation and need a partner who understands both the creative and the operational sides of brand installation, connect with the Kingsixteen team to discuss your project scope and timeline.
FAQ
What are the eight phases of a brand installation process?
The eight core phases are planning, survey, design approval, fabrication, logistics, installation, quality validation, and final handover. Each phase must be completed in sequence to prevent compounding errors.
How long does a brand installation take?
A standard single-facade installation typically takes several hours, while complex multi-element projects can span multiple days. Timeline depends on site conditions, permitting, and the number of locations involved.
Why do multi-location brand rollouts fail?
The most common causes are misaligned installers, underestimated permitting complexity, and fragmented vendor networks. Pilot waves and centralized dashboards are the most effective tools for preventing these failures.
What is a field packet and why does it matter?
A field packet is a standardized document containing site contacts, access windows, surface prep requirements, and escalation paths. It ensures every crew member operates from the same information, regardless of location.
When should installations be scheduled to protect the brand experience?
Off-hours scheduling is the standard practice for retail and healthcare environments. Installing during business hours risks customer disruption and undermines the brand experience you are building.